如何运行Hugging Face大模型StarCoder
- 12/16/2023

StarCoder 是一款经过源代码和自然语言文本训练的语言模型(LM),它是在 StarCoderBase 的基础上进行了进一步的优化和调整。作为 HuggingFace 旗下的 text-generation 类型的模型,StarCoder 专注于为各种编程语言提供高效的代码补全功能。
你可以通过 bigcode-playground 🔗 来亲身体验 StarCoder 的强大功能。这个平台提供了一个交互式环境,让你可以在各种编程语言中体验 StarCoder 的代码补全效果。 鉴于免费的推理(inference)API 存在额度限制,而且受国内访问限制,我们需要将大型语言模型部署到本地。然而,由于大型模型对硬件的高要求,因此使用已经训练好的模型进行本地部署是一种方便且迅速的解决方案。在实现代码补全功能方面,StarCoder 是理想的选择。
考虑到 GPU 在训练和运行大型模型时的强大性能,我们特别选择了 NVIDIA A800 80GB 的 GPU,并在其上安装了 CentOS 7.9 操作系统。这一硬件环境为我们提供了强大的计算能力,使得 StarCoder 在本地能够高效地执行代码补全任务。
通过使用本地 GPU,我们不仅能够克服推理 API 的限制,还能够充分发挥硬件的优势,提升模型的性能和效率。这种配置旨在提供一个可靠、高性能的环境,使得 StarCoder 能够在本地快速而有效地完成代码补全任务。
-
大模型:StarCoder 🔗
-
GPU:NVIDIA A800 80GB
-
GPU Driver Version:535.129.03 🔗
-
CUDA Version: 12.2 🔗
-
Docker:20.10
注意:由于拉取镜像及下载模型、启动模型需要访问ghcr.io、huggingface.co网站,而国内网络的限制性,请自行寻找方法确保过程中网络能够正常访问。
安装 NVIDIA 驱动、CUDA
在大多数情况下,如果仅有 GPU,操作系统将难以正确地与 GPU 进行通信,从而导致无法充分利用 GPU 进行图形处理和计算任务。为了完整的利用起来 GPU,这时候需要安装 NVIDIA 驱动和 CUDA。
NVIDIA 驱动是确保 GPU 正常工作的关键,能够将操作系统与 GPU 之间进行连接,从而确保操作系统能够有效的进行 GPU 调用。而 CUDA 则是为了让你的 GPU 能够更快、更有效地完成一些特殊的计算任务。这两者结合起来,让你的电脑在处理大型模型时能够更加强大。
注意 HuggingFace 推荐 11.8 及其以上版本的 CUDA。
- NVIDIA 驱动
选择 NVIDIA 驱动需要确保选择正确的硬件型号以及操作系统:
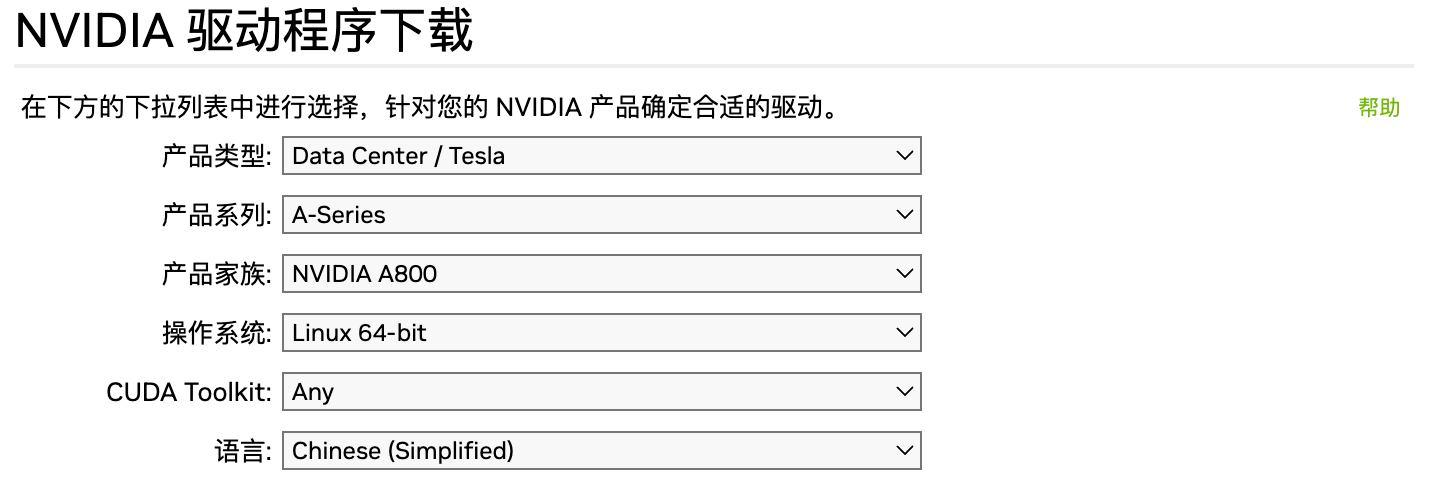
NVIDIA 驱动下载:https://www.nvidia.cn/Download/index.aspx?lang=cn 🔗
i) 'rpm -i nvidia-linux-535.129.03-1.0-1.x86_64.rpm'
ii) `yum clean all`
iii) `yum install cuda-drivers`
iv) `reboot`
- CUDA
选择 CUDA 同样需要选择正确的操作系统及其架构:
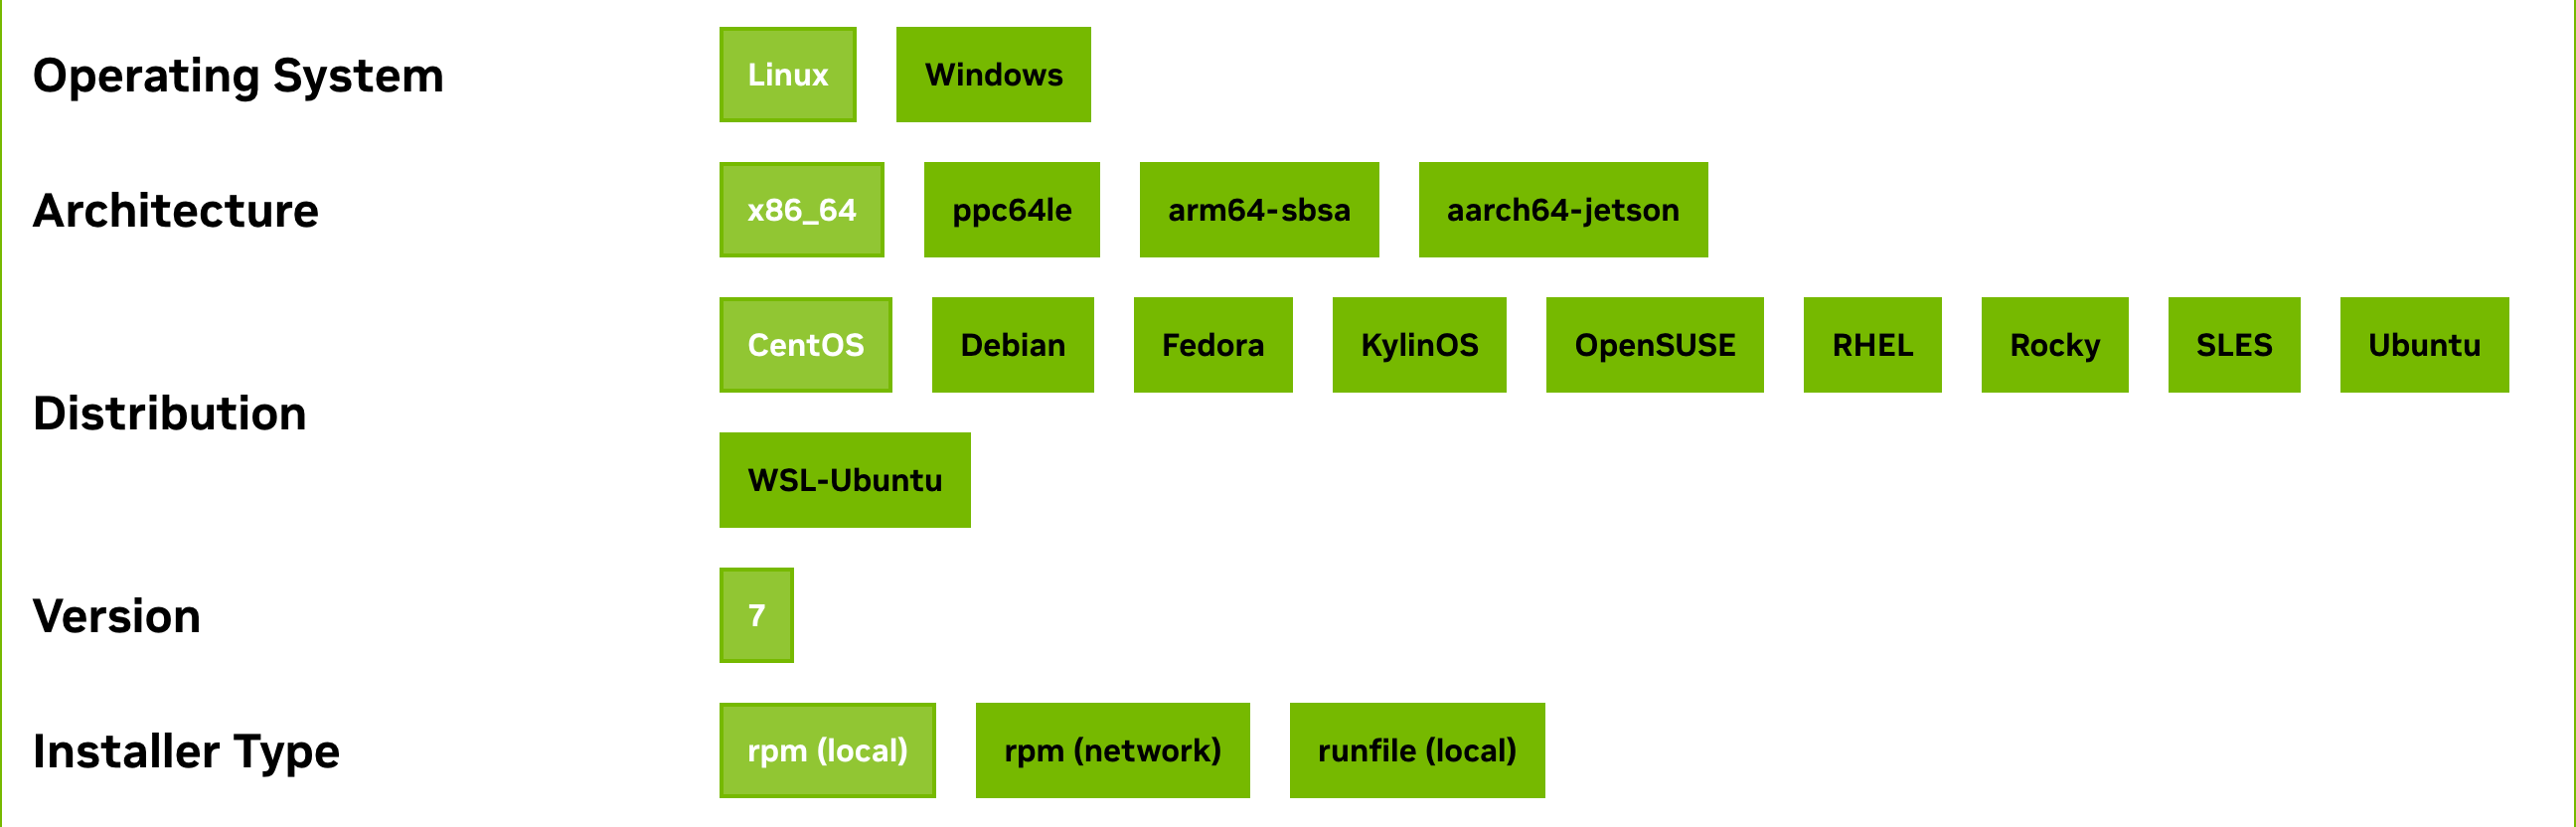
CUDA 安装系统依赖要求:https://docs.nvidia.com/cuda/archive/12.2.0/cuda-installation-guide-linux/index.html#system-requirements 🔗
wget https://developer.download.nvidia.com/compute/cuda/12.2.0/local_installers/cuda-repo-rhel7-12-2-local-12.2.0_535.54.03-1.x86_64.rpm
sudo rpm -i cuda-repo-rhel7-12-2-local-12.2.0_535.54.03-1.x86_64.rpm
sudo yum clean all
sudo yum -y install nvidia-driver-latest-dkms
sudo yum -y install cuda
验证:
输入nvidia-smi,如果能够看到类似下面的输出,说明驱动和 CUDA 都已经安装成功了。
# nvidia-smi
+---------------------------------------------------------------------------------------+
| NVIDIA-SMI 535.129.03             Driver Version: 535.129.03   CUDA Version: 12.2     |
|-----------------------------------------+----------------------+----------------------+
| GPU  Name                 Persistence-M | Bus-Id        Disp.A | Volatile Uncorr. ECC |
| Fan  Temp   Perf          Pwr:Usage/Cap |         Memory-Usage | GPU-Util  Compute M. |
|                                         |                      |               MIG M. |
|=========================================+======================+======================|
|   0  NVIDIA A800 80GB PCIe          Off | 00000000:B1:00.0 Off |                    0 |
| N/A   40C    P0              68W / 300W |      4MiB / 81920MiB |     23%      Default |
|                                         |                      |             Disabled |
+-----------------------------------------+----------------------+----------------------+

+---------------------------------------------------------------------------------------+
| Processes:                                                                            |
|  GPU   GI   CI        PID   Type   Process name                            GPU Memory |
|        ID   ID                                                             Usage      |
|=======================================================================================|
|  No running processes found                                                           |
+---------------------------------------------------------------------------------------+
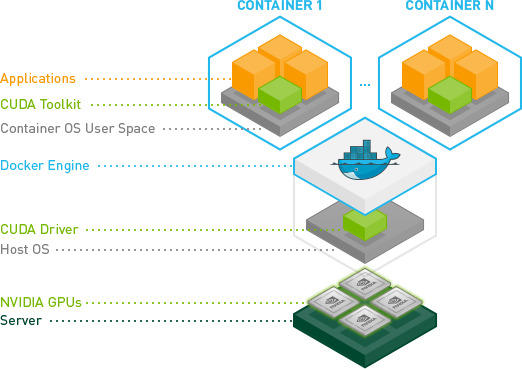
安装 Docker、NVIDIA Container Toolkit
为了在 Docker 中使用 GPU,需要确保安装了特定版本的 Docker 并配置了 NVIDIA Container Toolkit。
首先,确保已安装 Docker 的 19 版本或更高版本,因为在这个版本之后,Docker 才开始支持--gpus参数。这个参数使得在 Docker 中使用 GPU 变得简单。
其次,为了充分利用 GPU,安装 NVIDIA Container Toolkit。该工具包允许用户构建和运行 GPU 加速容器,提高容器中 GPU 的性能。
- Docker-CE
# 安装依赖包
sudo yum install -y yum-utils device-mapper-persistent-data lvm2
# 添加Docker官方GPG密钥
sudo yum-config-manager --add-repo https://download.docker.com/linux/centos/docker-ce.repo
sudo rpm --import https://download.docker.com/linux/centos/gpg
# 安装docker-ce
sudo yum install -y docker-ce-20.10.18 docker-ce-cli-20.10.18 containerd.io
# 启动Docker服务并设置开机自启
sudo systemctl start docker
sudo systemctl enable docker
- NVIDIA Container Toolkit
方法一:在线安装
# 配置yum源
curl -s -L https://nvidia.github.io/libnvidia-container/stable/rpm/nvidia-container-toolkit.repo | \
  sudo tee /etc/yum.repos.d/nvidia-container-toolkit.repo
# 配置开启实验性包(可选)
sudo yum-config-manager --enable nvidia-container-toolkit-experimental
# 安装
sudo yum install -y nvidia-container-toolkit
# 重启docker
sudo systemctl restart docker
其他系统安装:https://docs.nvidia.com/datacenter/cloud-native/container-toolkit/latest/install-guide.html 🔗
方法二:离线安装
wget https://github.com/NVIDIA/libnvidia-container/raw/refs/heads/gh-pages/stable/deb/amd64/libnvidia-container-tools_1.17.8-1_amd64.deb
wget https://github.com/NVIDIA/libnvidia-container/raw/refs/heads/gh-pages/stable/deb/amd64/libnvidia-container1_1.17.8-1_amd64.deb
wget https://github.com/NVIDIA/libnvidia-container/raw/refs/heads/gh-pages/stable/deb/amd64/nvidia-container-toolkit-base_1.17.8-1_amd64.deb
wget https://github.com/NVIDIA/libnvidia-container/raw/refs/heads/gh-pages/stable/deb/amd64/nvidia-container-toolkit_1.17.8-1_amd64.deb
wget https://github.com/NVIDIA/libnvidia-container/raw/refs/heads/gh-pages/stable/deb/amd64/libnvidia-container-dev_1.17.8-1_amd64.deb
wget https://github.com/NVIDIA/libnvidia-container/raw/refs/heads/gh-pages/stable/deb/amd64/libnvidia-container1-dbg_1.17.8-1_amd64.deb

sudo dpkg -i libnvidia-container-tools_1.17.8-1_amd64.deb
sudo dpkg -i libnvidia-container1_1.17.8-1_amd64.deb
sudo dpkg -i nvidia-container-toolkit-base_1.17.8-1_amd64.deb
sudo dpkg -i nvidia-container-toolkit_1.17.8-1_amd64.deb
sudo dpkg -i libnvidia-container-dev_1.17.8-1_amd64.deb
sudo dpkg -i libnvidia-container1-dbg_1.17.8-1_amd64.deb
更多操作系统及版本:https://github.com/NVIDIA/libnvidia-container/tree/gh-pages 🔗
验证: 输入docker run --rm --gpus all nvidia/cuda:12.3.1-base-ubuntu22.04 nvidia-smi,如果能够看到类似下面的输出,说明 Docker 和 NVIDIA Container Toolkit 都已经安装成功了。
# docker run --rm --gpus all nvidia/cuda:12.3.1-base-ubuntu22.04 nvidia-smi
+---------------------------------------------------------------------------------------+
| NVIDIA-SMI 535.129.03             Driver Version: 535.129.03   CUDA Version: 12.3     |
|-----------------------------------------+----------------------+----------------------+
| GPU  Name                 Persistence-M | Bus-Id        Disp.A | Volatile Uncorr. ECC |
| Fan  Temp   Perf          Pwr:Usage/Cap |         Memory-Usage | GPU-Util  Compute M. |
|                                         |                      |               MIG M. |
|=========================================+======================+======================|
|   0  NVIDIA A800 80GB PCIe          Off | 00000000:B1:00.0 Off |                    0 |
| N/A   40C    P0              68W / 300W |      4MiB / 81920MiB |      0%      Default |
|                                         |                      |             Disabled |
+-----------------------------------------+----------------------+----------------------+

+---------------------------------------------------------------------------------------+
| Processes:                                                                            |
|  GPU   GI   CI        PID   Type   Process name                            GPU Memory |
|        ID   ID                                                             Usage      |
|=======================================================================================|
+---------------------------------------------------------------------------------------+
下载模型
由于网络环境的特殊性,我们需要在使用模型之前提前将其下载到本地。有多种下载方式可供选择,而我们将使用 Hugging Face Client Library 来实现这一操作。
以下是使用容器进行模型下载的步骤:
- 运行以下 Docker 命令,以确保下载过程中有足够的权限,并将下载的文件存储在指定的本地目录中:
docker run --privileged=true -v /root/.cache/:/root/.cache/ --rm --workdir /root -it python:3.9 bash
- 在容器中安装必要的 pip 依赖,以便使用 Hugging Face Client Library:
pip install huggingface-hub -i https://pypi.tuna.tsinghua.edu.cn/simple
- 接下来,您可以使用下面的 Python 脚本执行实际的模型文件下载。
from huggingface_hub import hf_hub_download

HUGGING_FACE_API_KEY = "YOUR-API-KEY"

# Replace this if you want to use a different model
model_id = "bigcode/starcoder"
filenames = [
              "pytorch_model-00001-of-00007.bin",
              "pytorch_model-00002-of-00007.bin",
              "pytorch_model-00003-of-00007.bin",
              "pytorch_model-00004-of-00007.bin",
              "pytorch_model-00005-of-00007.bin",
              "pytorch_model-00006-of-00007.bin",
              "pytorch_model-00007-of-00007.bin",
              ".gitattributes",
              "config.json",
              "generation_config.json",
              "merges.txt",
              "pytorch_model.bin.index.json",
              "special_tokens_map.json",
              "tokenizer.json",
              "tokenizer_config.json",
              "vocab.json"
              ]

for filename in filenames:
    downloaded_model_path = hf_hub_download(
        repo_id=model_id,
        filename=filename,
        token=HUGGING_FACE_API_KEY
    )

    print(downloaded_model_path)

print(downloaded_model_path)
采用以上代码进行下载,需要注意:
- HUGGING_FACE_API_KEY:填写 Hugging Face 的API-KEY 🔗
- model_id:需要下载模型名称
- filenames:需要下载的文件名称,可以进入开源的代码仓进行查看
下载完成之后会存入到本地的/root/.cache/huggingface/hub目录下。
/root/.cache/huggingface/hub/models--bigcode--starcoder/snapshots/e117ab3b3d0769fd962bd48b099de711757a3d60/pytorch_model-00001-of-00007.bin
/root/.cache/huggingface/hub/models--bigcode--starcoder/snapshots/e117ab3b3d0769fd962bd48b099de711757a3d60/pytorch_model-00002-of-00007.bin
/root/.cache/huggingface/hub/models--bigcode--starcoder/snapshots/e117ab3b3d0769fd962bd48b099de711757a3d60/pytorch_model-00003-of-00007.bin
/root/.cache/huggingface/hub/models--bigcode--starcoder/snapshots/e117ab3b3d0769fd962bd48b099de711757a3d60/pytorch_model-00004-of-00007.bin
/root/.cache/huggingface/hub/models--bigcode--starcoder/snapshots/e117ab3b3d0769fd962bd48b099de711757a3d60/pytorch_model-00005-of-00007.bin
/root/.cache/huggingface/hub/models--bigcode--starcoder/snapshots/e117ab3b3d0769fd962bd48b099de711757a3d60/pytorch_model-00006-of-00007.bin
/root/.cache/huggingface/hub/models--bigcode--starcoder/snapshots/e117ab3b3d0769fd962bd48b099de711757a3d60/pytorch_model-00007-of-00007.bin
/root/.cache/huggingface/hub/models--bigcode--starcoder/snapshots/e117ab3b3d0769fd962bd48b099de711757a3d60/config.json
/root/.cache/huggingface/hub/models--bigcode--starcoder/snapshots/e117ab3b3d0769fd962bd48b099de711757a3d60/generation_config.json
/root/.cache/huggingface/hub/models--bigcode--starcoder/snapshots/e117ab3b3d0769fd962bd48b099de711757a3d60/merges.txt
/root/.cache/huggingface/hub/models--bigcode--starcoder/snapshots/e117ab3b3d0769fd962bd48b099de711757a3d60/pytorch_model.bin.index.json
/root/.cache/huggingface/hub/models--bigcode--starcoder/snapshots/e117ab3b3d0769fd962bd48b099de711757a3d60/special_tokens_map.json
/root/.cache/huggingface/hub/models--bigcode--starcoder/snapshots/e117ab3b3d0769fd962bd48b099de711757a3d60/tokenizer.json
/root/.cache/huggingface/hub/models--bigcode--starcoder/snapshots/e117ab3b3d0769fd962bd48b099de711757a3d60/tokenizer_config.json
/root/.cache/huggingface/hub/models--bigcode--starcoder/snapshots/e117ab3b3d0769fd962bd48b099de711757a3d60/vocab.json
/root/.cache/huggingface/hub/models--bigcode--starcoder/snapshots/e117ab3b3d0769fd962bd48b099de711757a3d60/vocab.json
其他下载方式:https://huggingface.co/docs/hub/models-downloading 🔗
运行模型
将下载的大模型复制到指定路径
 # 复制模型到指定路径
 cp ~/.cache/huggingface/hub/models--bigcode--starcoder/ /root/huggingface/starCoder/data
使用以下命令运行大模型:
docker run --privileged=true -p 8080:80 --gpus all -v /root/huggingface/starCoder/data:/data -e HUGGING_FACE_HUB_TOKEN=YOUR-API-KEY -d ghcr.io/huggingface/text-generation-inference:1.3.3 --model-id bigcode/starcoder --max-total-tokens 8192
--privileged=true: 启用容器的特权模式,这允许容器访问主机的硬件资源,如 GPU。在这种情况下,可能是为了确保容器可以访问 GPU。-p 8080:80: 将主机的端口 8080 映射到容器的端口 80。这样可以通过主机的 8080 端口访问在容器内运行的服务。--gpus all: 指定容器可以使用所有可用的 GPU。这是使用 NVIDIA Container Toolkit 的一部分,确保容器能够访问并使用 GPU 资源。-v /root/huggingface/starCoder/data:/data: 将主机上的/root/huggingface/starCoder/data目录映射到容器内的/data目录。这样可以在容器和主机之间共享数据。HUGGING_FACE_HUB_TOKEN: Hugging FaceAPI-KEY 🔗
注意:
- text-generation-inference 仅支持部分大模型
- 启动过程中需要确保容器内能正常访问
huggingface.co
查看容器日志:
INFO text_generation_launcher: Args { model_id: "bigcode/starcoder", revision: None, validation_workers: 2, sharded: None, num_shard: None, quantize: None, speculate: None, dtype: None, trust_remote_code: false, max_concurrent_requests: 128, max_best_of: 2, max_stop_sequences: 4, max_top_n_tokens: 5, max_input_length: 1024, max_total_tokens: 2048, waiting_served_ratio: 1.2, max_batch_prefill_tokens: 4096, max_batch_total_tokens: None, max_waiting_tokens: 20, hostname: "bogon", port: 80, shard_uds_path: "/tmp/text-generation-server", master_addr: "localhost", master_port: 29500, huggingface_hub_cache: Some("/data"), weights_cache_override: None, disable_custom_kernels: false, cuda_memory_fraction: 1.0, rope_scaling: None, rope_factor: None, json_output: false, otlp_endpoint: None, cors_allow_origin: [], watermark_gamma: None, watermark_delta: None, ngrok: false, ngrok_authtoken: None, ngrok_edge: None, env: false }
INFO download: text_generation_launcher: Starting download process.
INFO text_generation_launcher: Files are already present on the host. Skipping download.

INFO download: text_generation_launcher: Successfully downloaded weights.
INFO shard-manager: text_generation_launcher: Starting shard rank=0
INFO shard-manager: text_generation_launcher: Waiting for shard to be ready... rank=0
INFO text_generation_launcher: Server started at unix:///tmp/text-generation-server-0

INFO shard-manager: text_generation_launcher: Shard ready in 18.948847982s rank=0
INFO text_generation_launcher: Starting Webserver
WARN text_generation_router: router/src/main.rs:166: Could not find a fast tokenizer implementation for bigcode/starcoder
WARN text_generation_router: router/src/main.rs:169: Rust input length validation and truncation is disabled
WARN text_generation_router: router/src/main.rs:349: `--revision` is not set
WARN text_generation_router: router/src/main.rs:350: We strongly advise to set it to a known supported commit.
INFO text_generation_router: router/src/main.rs:371: Serving revision e117ab3b3d0769fd962bd48b099de711757a3d60 of model bigcode/starcoder
INFO text_generation_router: router/src/main.rs:213: Warming up model
INFO text_generation_router: router/src/main.rs:246: Setting max batch total tokens to 2491968
INFO text_generation_router: router/src/main.rs:247: Connected
WARN text_generation_router: router/src/main.rs:252: Invalid hostname, defaulting to 0.0.0.0
验证大模型: 如果需要测试 API 进行验证,可以请求容器地址或本机地址,发现正常响应,并且整个请求的处理时间很迅速:
# 请求
curl -i --request POST 'http://localhost:8080' --header 'Content-Type: application/json' --header 'Accept: */*' --header 'Connection: keep-alive' --data '{
    "inputs": "<fim_prefix><filename>test2.js\nconst a = '\''a'\''\n\nconsole.log(<fim_suffix>)<fim_middle>",
    "parameters": {
        "top_p": 0.9,
        "return_full_text": false,
        "num_return_sequences": 1,
        "max_new_tokens": 256,
        "temperature": 0.2,
        "repetition_penalty": 1.2
    }
}'
# 响应
HTTP/1.1 200 OK
content-type: application/json
x-compute-type: gpu+optimized
x-compute-time: 57
x-compute-characters: 83
x-total-time: 57
x-validation-time: 0
x-queue-time: 0
x-inference-time: 57
x-time-per-token: 28
content-length: 24
access-control-allow-origin: *
vary: origin
vary: access-control-request-method
vary: access-control-request-headers

[{"generated_text":"a"}]
验证 GPU:
如果需要验证 GPU 是否正常工作,可以使用nvidia-smi命令查看 GPU 的使用情况:
# nvidia-smi
+---------------------------------------------------------------------------------------+
| NVIDIA-SMI 535.129.03             Driver Version: 535.129.03   CUDA Version: 12.2     |
|-----------------------------------------+----------------------+----------------------+
| GPU  Name                 Persistence-M | Bus-Id        Disp.A | Volatile Uncorr. ECC |
| Fan  Temp   Perf          Pwr:Usage/Cap |         Memory-Usage | GPU-Util  Compute M. |
|                                         |                      |               MIG M. |
|=========================================+======================+======================|
|   0  NVIDIA A800 80GB PCIe          Off | 00000000:B1:00.0 Off |                    0 |
| N/A   41C    P0              68W / 300W |  79469MiB / 81920MiB |      0%      Default |
|                                         |                      |             Disabled |
+-----------------------------------------+----------------------+----------------------+

+---------------------------------------------------------------------------------------+
| Processes:                                                                            |
|  GPU   GI   CI        PID   Type   Process name                            GPU Memory |
|        ID   ID                                                             Usage      |
|=======================================================================================|
|    0   N/A  N/A     48614      C   /opt/conda/bin/python3.10                 79456MiB |
+---------------------------------------------------------------------------------------+
Depencies:
本文为原创内容,欢迎分享与引用,请保留作者与原文链接。